 |
| Sari - She knows her Mind |
Whenever I want to decorate my home or buy something for the house, certain times I'm not happy with the value of the products. Not only they take up too much money but their quality is debatable. That is when I decided to look around and take inspiration from some of my relatives who are very good at making things on a budget. It is fun, less costly and gives more satisfaction as per my personal experience. Initially I did not seem to have the patience for doing things myself. But slowly the ideas started growing on me. Sari or Saree is the traditional wear of India worn in different styles across the country. Here is a list of easy ideas you can incorporate using a sari at your home without much fuss. You will be as surprised as me with some of these do-it-yourself ideas. I myself did not believe it till I saw some of them. Hope you like it.
Images:
Chandradey,photobucket.com,lemontree
What is a Sari?
Sari is the
traditional Indian wear that is worn both in the North and the South. There are
different styles of saris at different prices.
It is available in
two lengths - six yards and nine yards. Most common type of sari worn is the
six yard sari. For some styles of sari the other length is preferred. It is
draped elegantly around the body is different fashions.
The sari is a very
unique wear as it can convey homeliness, calmness, elegance, glamour and
fashion all depending on the person wearing it. Till my mother's generation,it
is the commonly accepted wear for ladies.
In ancient period,
the Hindus believed that a fabric loses its purity when it is cut and stitched.
That is why they preferred the sari which is made out of a single smooth cloth.
Recycle and Reuse
My mother has a lot
of used and old saris some of which are still in good condition. I tried these
activities with that and I’m very happy with the outcome. Saris can be used for
a variety of purposes within the house. It is economic and at the same time
very beautiful to look at.
Here are some simple
things you can do as a do-it-yourself (DIY) hobby and put these saris to good use.
How to make a floor mat
My aunt is an expert
in making handicrafts out of used saris. She introduced this craft to her whole
village through women's self-help team. Now every house in the village has at
least one self-made mat.

Materials:
·
Old Sari - 1
·
Glue
·
Sewing thread
·
Scissors
Instructions:
1. Take an old clean sari and cut it into
breadthwise strips.
2. Tie the first three strips together at the
top. Then plait the strips just like braiding hair. When you reach the desired
length of the floor mat sew the bottom side so that the plait is held in place.
3. Take the next three strips, tie at the top.
Plait it tightly and sew the bottom side.Repeat the process till you get the
desired breadth of the floor mat.
4. Stick all these separate plaited strips to
one another with the help of a strong glue.
5. Take a thread and sew the loose ends if
any.Place a heavy object on the mat till the glue dries.
6. The above procedure is for straight mats.
Alternately you can make round or oval mats too.
Finally decorate the
mat with color pastes or glitter pastes.
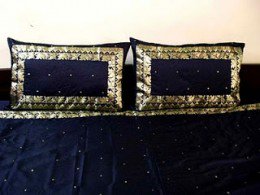
Cushion Cover
Choose a sari with
uniform design. Cut the sari as per the measurement of the cushion to be
covered.
Stitch the sari in
along three sides to make a pouch.
Insert the cushion
into the sari and then stitch the final corner.
Now your favorite
sari can adorn the sitting room!
Using the same
procedure you can make a pillow cover too.
Bed Canopy
Do you have a king
size bed that needs a little bit of decoration? Use multiple colored saris to
make a great bed canopy.
In the baduga
tradition saris are used to decorate the wedding altar. This inspired me to try
some new decorations with saris in my own bed and needless to say it looks
elegant.

Bed canopies can be
made with hooks similar to curtains. Then the sari can simply be draped over
the hooks.
Curtains
The advantage of
using a sari for a variety of purposes is that saris are available in different
shades and beautiful materials. There are literally thousands of varieties
depending on the area in which it is manufactured. Choose a light weight
embroidered sari for making curtains. You even have lace saris for making lace
curtains.Measure the doorway and cut the sari according to the needed length.
Hem the borders. You can even choose borders from some other sari and stitch it
over another sari for an impressive effect.
How to make a Tablecloth
Stencils and fabric
paints are a great way to make your own table cloth. They are available in a
variety of designs and sizes.
Make sure to choose a
light colored sari as background for dark colored stencil drawing. You can
experiment with a variety of paints and fabrics using this technique.
If you want to make
your own stencil at home, use chart paper to cut the design you like just like
a stencil. Then follow the same procedure.
Materials:
·
Sari
·
Stencils
·
Fabric Paint
·
Sewing thread
Instructions:
1. First cut and hem the length of the sari you
want to use as a table cloth.
2. Place a cardboard on the table. On it place
the sari.
3. Keep the stencil and measure the number of
designs you can make at approximately equal intervals.
4. Now start tracing the design using the
stencil with roll over fabric paint
5. Wait till the design is dry and trace the
next pattern. Repeat this process till the entire cloth is designed.
6. Allow the cloth to dry.
Letter holder
Take a thin strip of
a sari of your choice.
Measure the length of
the holder you need. For instance if you need 15 cm as the length, start
measuring from the top of th strip. At 20 cm, fold the sari upward to the 15 cm
mark. A small pouch is created by this effect. Stitch the two sides well. Your
topmost holder is ready. Repeat the process till you arrive at three or four
holders as you require.
Your letter holder is
ready. You can decorate the outer sides with bows and sticker stars.
Make a Pillow

For making a pillow,
buy some cotton cloth and stuff it uniformly with rags or unwanted cloth
pieces. It helps if all the rags are of the same material. My mother makes it
with the pieces of cloth she cuts away while stitching a cloth. Then she
collects all these tiny bits and puts them in a cotton cloth already stitched
along three corners. After filling the cotton pouch, she stitches the final
side and covers it with a sari cover. It looks and feels absolutely great!
Do you have any more interesting ideas for a DIY project? Let us know!


Thank you for sharing amazing ideas, by doing this we can utilize extra things which are in our houses, I will also try to make pillow covers
ReplyDeletefrom saree.